Are you looking for a simple yet effective way to grow your email list and boost your email marketing game? Look no further, though there are many strategies you can use to build an email list. Today, I will show you how to build email list with contact form. Yes, that humble little box on your website can be a powerhouse for building your email list.
In this guide, we’ll look into how you can harness the contact form on your WordPress website to grow your email subscribers without using any lead magnet. So, settle down as I walk you through the step-by-step tutorial on how you can turn your website visitors into loyal subscribers!
We will use the Fluent Forms WordPress plugin for this tutorial to achieve a better result.
Table of Contents
Why Use a Contact Form to Grow Your Email List?
A contact form on your website is one of the easiest and most cost-effective ways to grow your email list. Your website visitors are already familiar with contact forms, making it simple to subscribe to your list without navigating to a separate sign-up page. With a contact form, you can capture leads already engaged with your content or services, increasing the likelihood of conversion. It simplifies the user experience on your website and reduces the steps required for visitors to subscribe.
Using a contact form to grow your email list can lead to higher conversion rates, improved user experience, and a more engaged subscriber base.
Why Use Fluent Forms Contact Plugin?
There are countless contact forms plugins on the WordPress repository, but Fluent Forms stands out. Fluent Forms allows you to create powerful, flexible and advanced forms quickly. With Fluent Forms, you can quickly create simple or complex forms, such as contact, registration, survey, quizzes, and conversational forms, by simply drag-and-drop method.
One of the key features of Fluent Forms is its drag-and-drop form builder, which makes it easy to customize your forms to suit your needs. You can add various form fields, rearrange them, and customize their appearance and settings with just a few clicks. It also offers various pre-made form templates you can use as a starting point for your forms, saving you time and effort.
I love the Fluent Forms plugin because it comes with advanced features that make it stand out from other form plugins. For example, it offers conditional logic, which allows you to show or hide form fields based on user input, making your forms more dynamic and interactive. It also supports multi-step forms, which break long forms into smaller, more manageable steps, improving user experience.
Another key feature of Fluent Forms is its extensive integrations with third-party services and tools. It integrates with popular email marketing services, CRM systems, payment gateways, and more, allowing you to automate your workflow and streamline your processes.
Some of the key integrations include:
- MailerLite
- Mailchimp
- AWeber
- GetResponse
- Campaign Monitor
- HubSpot
- ActiveCampaign
- Drip
- Brevo
- ConvertKit
- Moosend
- SendFox
- Constant Contact
- Mautic
- GetGist
- Mailjet
- Mailster
It also integrate well with other CRM, SMS and integration platforms like Zapier. This integration allows you to automatically add contact form submissions on your website to your email lists.
How to Build Email List with Contact Form using (Fluent Form)
Step 1 – Install Fluent Form
To get started you need to download the Fluent Forms plugin and the Fluent Forms Pro, to do that you need to visit the Fluent Forms website and purchase the Fluent Forms Pro plugin.
Once you downloaded the Pro plugin with the license, log in to your WordPress dashboard and click on the plugin to install and activate the free version of the Fluent Forms plugin from your WordPress dashboard.
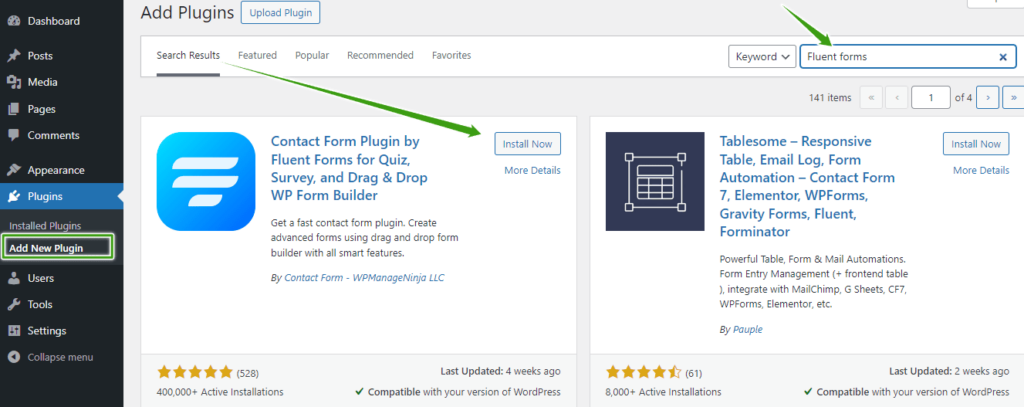
Now, install and activate the free version of the Fluent Forms plugin.
Next, install and activate the Fluent Forms Pro Add-on pack you downloaded from the Fluent Forms Website and activate your license.
Once the Pro version is installed and activated, you are now ready to integrate the Fluent Forms contact form into any email marketing services of your choice.
Step 2 – Integrate Fluent Forms with Your Email Marketing Platform
Now, you need to connect the Fluent Forms to your email service provider.
To integrate Fluent Forms with any email marketing service provider like MailerLite, hover on Fluent Form Pro on the left-hand side of your dashboard and click Integration.
Once you click the Integration, you will see the list of all Fluent Forms modules. Just enable the modules of the email marketing service of your choice, and you are ready to go.
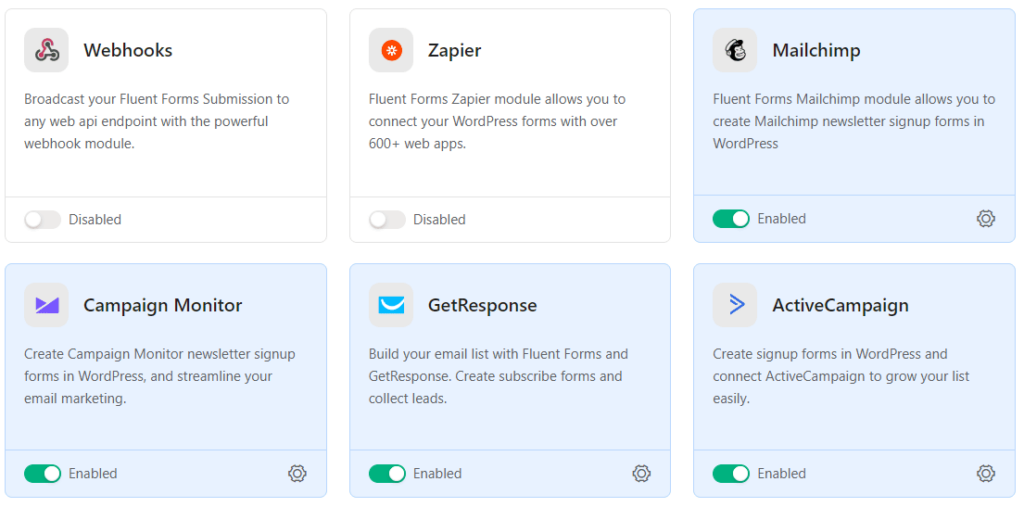
After you enable your preferred email marketing module, you need to click the settings icon to add your API and Secret Key to link your Contact form to the email marketing platform.
You need an API to link any email marketing platform to your contact form and most email marketing platforms will provide you with the required API key. You can get your API key under the settings or Developer page within the dashboard of the email marketing platform you subscribe to. For instance, in this tutorial, I use ActiveCampaign email marketing and you can find your API and Secret key under the developer tab.

Once you get the API and API Key ready, paste them in the required box in the Fluent Forms email marketing module and click save as seen in the image below.
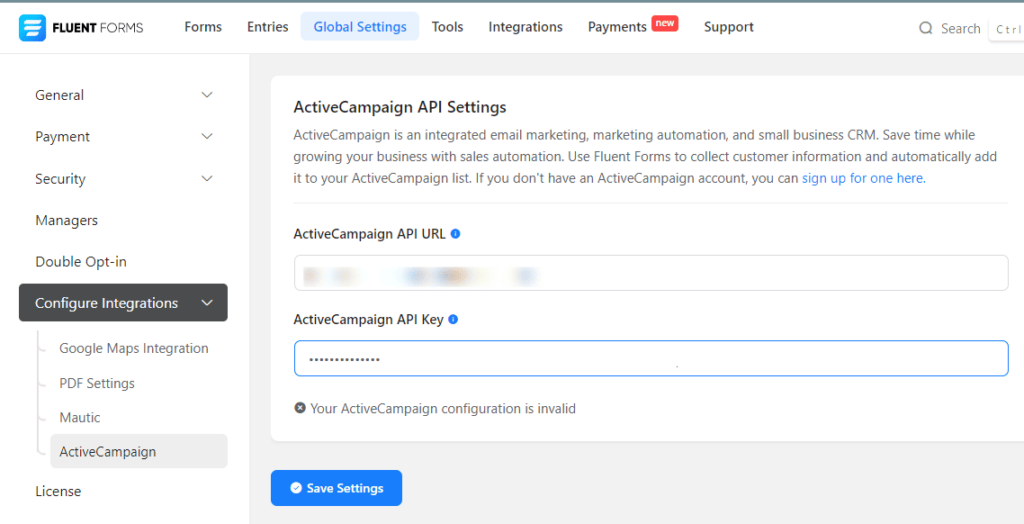
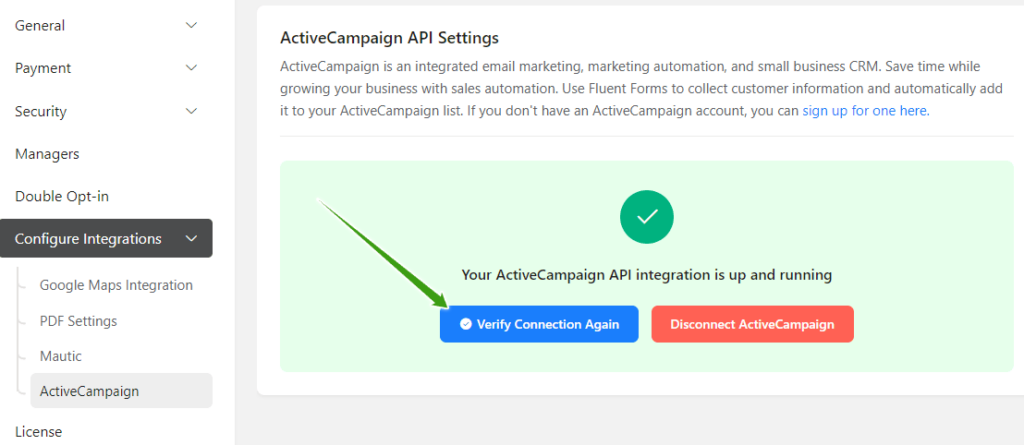
If you copy the right API and API Key, your API integration should be up and running. You can also click the verify connection button to re-verify your connection.
Step 3 – Create your Contact form
Once, you successfully integrated your Fluent Forms with your desired email marketing platform like MailerLite or ActiveCampaign, it’s time to create a contact form to use on your website.
To create a new contact form, hover on Fluent Forms and click on New Form, you will see several templates, you can pick any befitting template or create a new form from scratch by selecting New Blank Form.
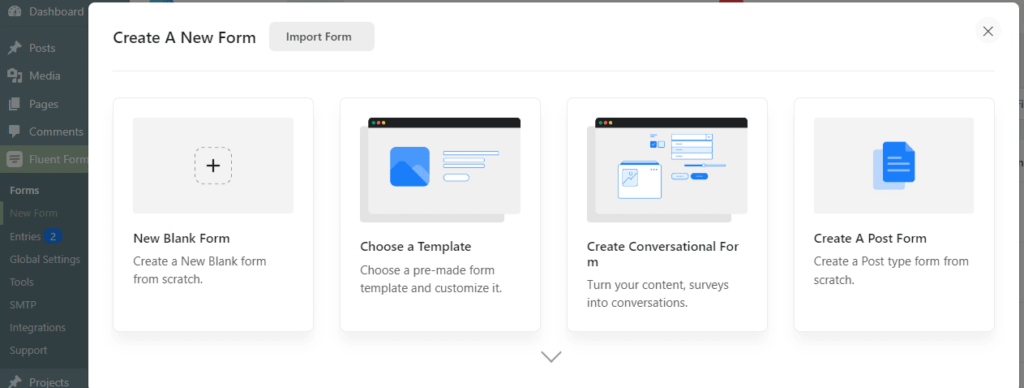
You can create any form from scratch, but for the sake of this guide, we will use a template to speed things up. Click “Choose a Template” to choose a pre-made contact form. Once you see a template that fits your goal, hover over it and click Create Form.
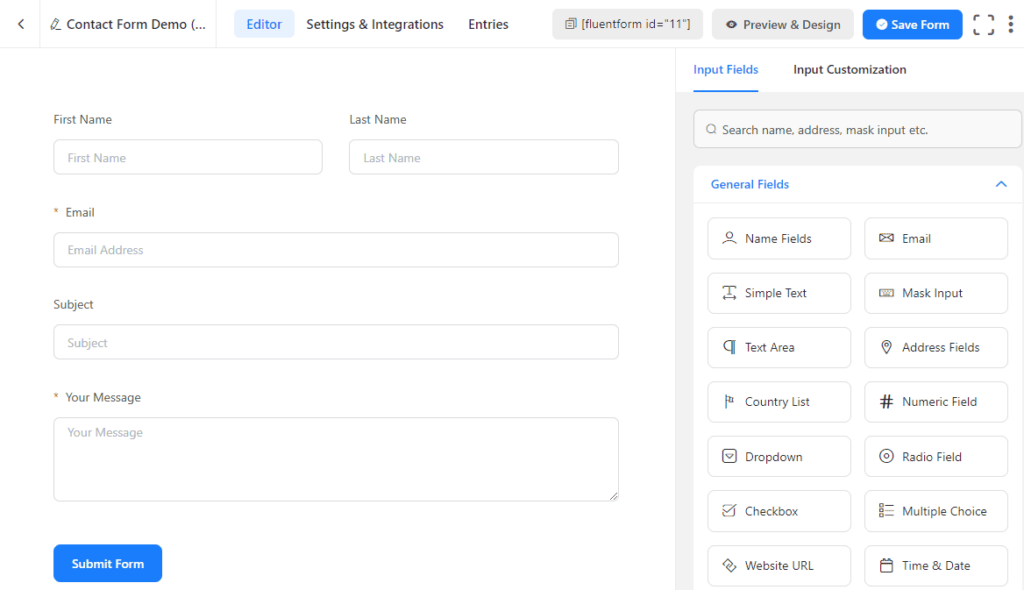
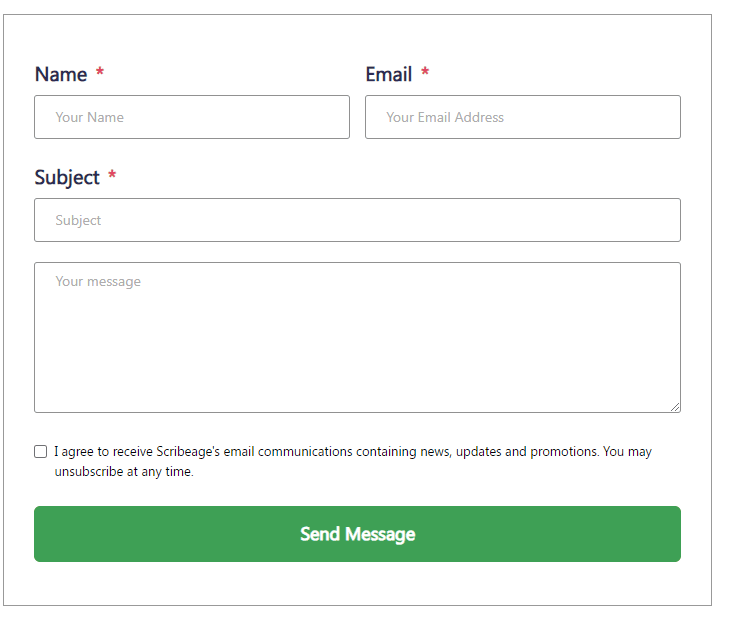
The above pre-made form looks good for a contact form page, you style it or add a new field to it. You may add a checkbox to your form to enable people to opt-in to join your email lists, just like we have on our contact form.
To add any field to your form, simply drag the field to your form and place it in the proper place. You can also edit each field to your taste. Once everything is set, click the save form button at the top right-hand side of the form page.
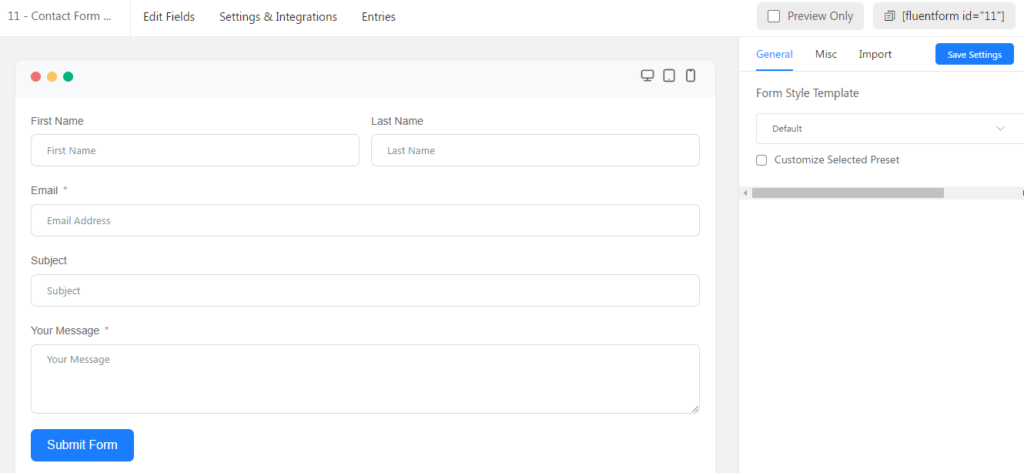
You can also preview and Design your Fluent Forms on the front page to ensure your is responsive on every device.
Step 4 – Connect Fluent Form with Your Email Marketing Platform
To connect your Fluent Form with your email marketing platform. Click on “Setting & Integration” and stroll down to select the “Configure Integrations” tab.
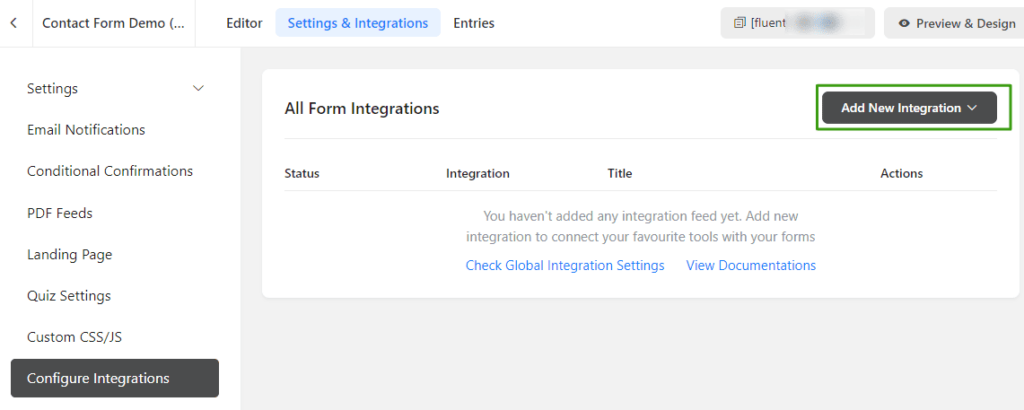
Click on the Add New Integration button at the top right-hand side of the integration page to select your chosen email marketing platform. Select the right email marketing platform, you integrated in step 2 above.
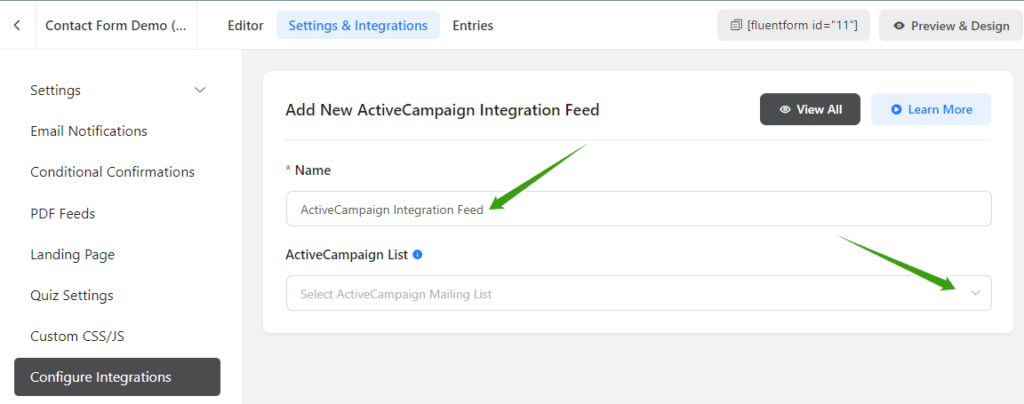
Once you choose the right email marketing platform, enter your integration name, (can be any name) and select the right segment you want your contact to be stored in. After that, you’ll be prompted to map your form fields to the corresponding fields in your email marketing platform. This ensures that the data is transferred accurately. For example, map the “Name” field in your form to the “Name” field in your email marketing platform.
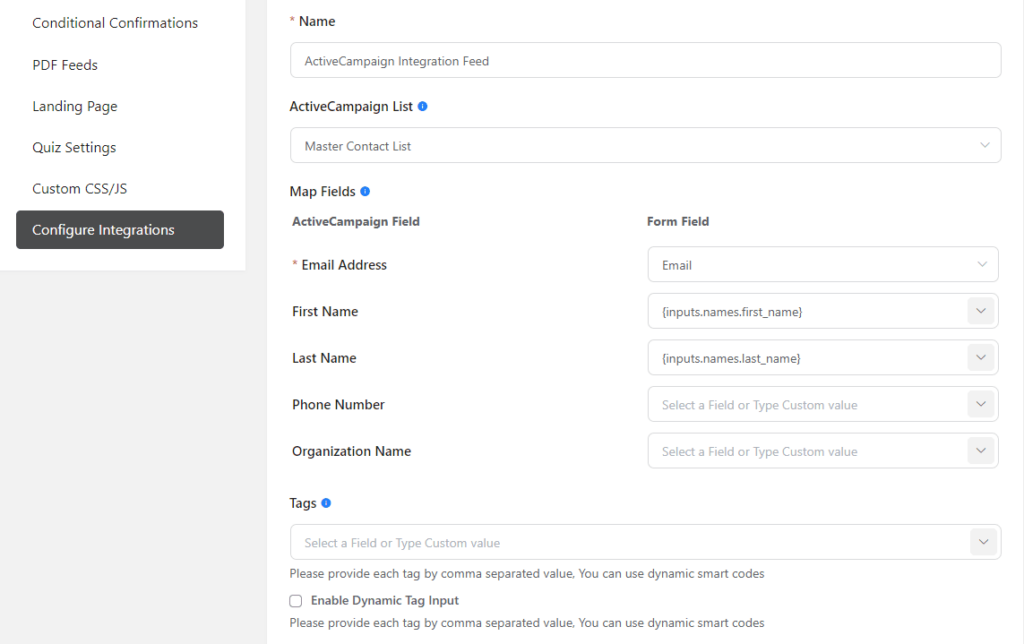
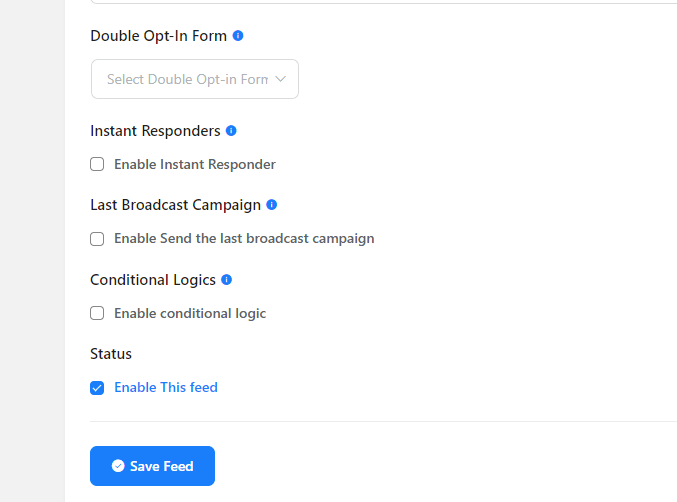
Depending on your email marketing platform, you may have the option to configure opt-in settings. This allows you to choose whether subscribers should be added to your list immediately or require confirmation.
Once you’ve configured the settings, click the save feed button to save your changes.
Step 5 – Add the Contact Form to Your Contact Page
Now that your Fluent Forms contact form is ready and integrated with your email marketing platform, it’s time to add the form to your contact page.
At the top of the page where you created your form, you will see the Fluent Form embed code that needs to be copied and pasted on any page of your website. The code carries fluent form id [fluentform id=”100″] at the top of the page. Click the shortcode to copy it and paste it to your contact page.
Once, you copy the code, go ahead and add the form shortcode to your contact page and the form will display currently as you design it.
Now that you have a contact form on your contact page ready to serve as an opt-in form to generate leads. To ensure your form integrates well with your email marketing platform, you need to test the form. It’s a good idea to test the integration by submitting a form on your website and ensuring that the data is correctly transferred to your email marketing platform.
How to Access the Submitted Forms in Fluent Form?
With Fluent Form, you can set submitted forms to be sent to your email address(s), you can also send thank you emails to anyone who fills out forms on your website or redirect them to another page on your website.
You can also access the submitted form on your WordPress Dashboard.
On your WordPress dashboard hover over Fluent Form and click on “Entries“; you’ll see a list of all the submitted forms. Click on the form submission ID to view the form, or click the View button under the action tab to view your form.

Once you click on any submission ID or View button to view the details of a submitted form, it will show you all the form fields and the data submitted by the user.
Difference Between a Contact Form and an Opt-in Form
You use contact forms on a website to allow visitors to reach you without revealing your email address. Contact forms usually include name, email address, message, and sometimes other fields like phone number or subject. The purpose of a contact form is to make it easy for visitors to send a message without using their email client, reducing the risk of spam and ensuring the message is delivered securely to your inbox.
Opt-in forms are to collect visitors’ email addresses or other contact information to build an email list. In opt-in forms, you often offer something valuable in return for the visitor’s information, such as a free e-book, a discount, or updates on new products or services. The goal of opt-in forms is to grow your email list, which you can use for email marketing campaigns to promote products, services, or content to your subscribers.
Though contact forms are used for visitors to send you messages or inquiries, you can also use contact forms as opt-in forms to collect visitor’s contact information to build and grow your email list for marketing purposes.
Final Thoughts
Building your email list through a contact form is a powerful strategy to convert your website users into a lead and boost your marketing efforts. By creating a compelling contact form using Fluent Forms you can turn people who reach out to you on your contact page into subscribers and grow your email list effectively. With a well-executed contact form on your contact page using the Fluent Forms contact plugin, you can enhance your email marketing efforts and drive greater success for your business.
Need to get a copy of your Fluent Form plugin? Click here to get the Fluent Form Pro for just $63/year or $279 for a lifetime license.


0 Comments