Forms play a crucial role in converting leads online. They are a fundamental component of the lead generation and conversion process in digital marketing and online business. Forms allow you to collect valuable information about your leads, such as their names, email addresses, phone numbers, and other demographic details.
This data is essential for understanding your audience, personalising your marketing efforts, and nurturing leads effectively. Forms are the primary means of capturing leads. When your website visitors fill out a form on your website or landing page, they are expressing an interest in your products or services, making them potential leads for your business. And that’s why I will show you how to create forms in Mautic in this article.
With forms, you can segment your leads based on the information they provide. This allows you to tailor your marketing messages and offers to specific groups of your contacts, increasing the relevance of your communication and improving conversion rates. You can use forms to qualify leads and ask about their needs, budget, timeline, and other criteria to determine how likely they are to become paying customers. The information collected can help your sales team prioritise leads and focus their efforts on the most promising prospects.
The data collected through forms lets you personalise your marketing messages and content. Personalisation can significantly enhance the user experience and increase the likelihood of conversion because it demonstrates that you understand and cater to the lead’s specific needs and preferences.
You can use forms to deliver relevant content, offers, and follow-up communications. This ongoing engagement through forms can help move leads through the sales funnel, ultimately leading to conversion. Forms are critical for converting online leads because they facilitate data collection, segmentation, personalisation, and lead nurturing. When used effectively, they can improve the efficiency and success of your lead generation and conversion efforts.
Table of Contents
What is Mautic
Mautic is an open-source marketing automation platform that allows you to create and manage forms to collect user data on your website or landing pages. With Mautic, you can create and customise any form to generate leads and convert them into paying customers. Today, I will show you how to create and style Mautic forms to look however you desire.
Related: How to Increase Lead Generation with Mautic’s Advanced Features
How to Create Forms in Mautic
Step 1
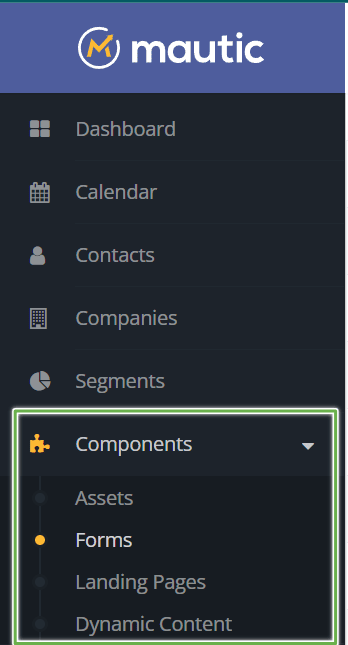
To begin the Mautic form-creating process, access your Mautic instance by logging in with your username and password. Navigate to the components section on your left-hand side of the dashboard and click “Forms.”
Step 2
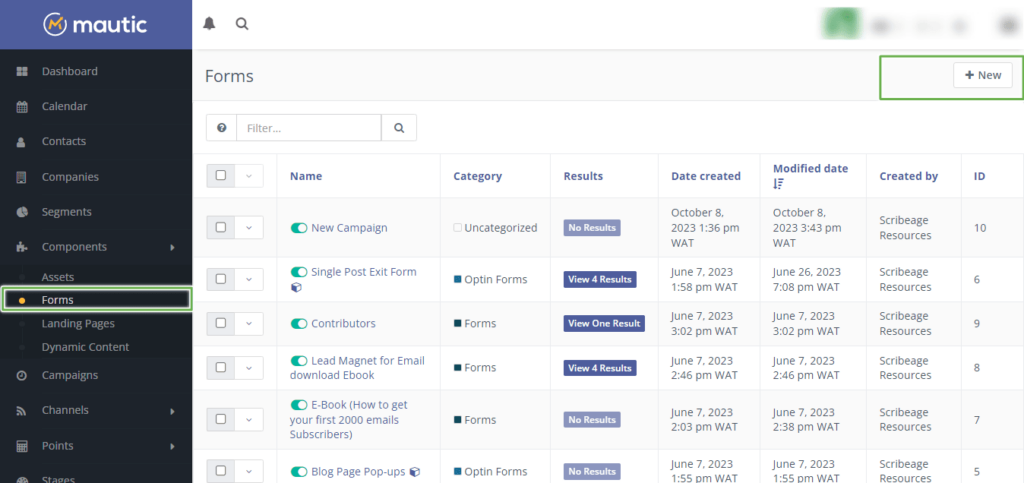
Add New Form
To Create a New Form, Click the “New” button to create a new form.
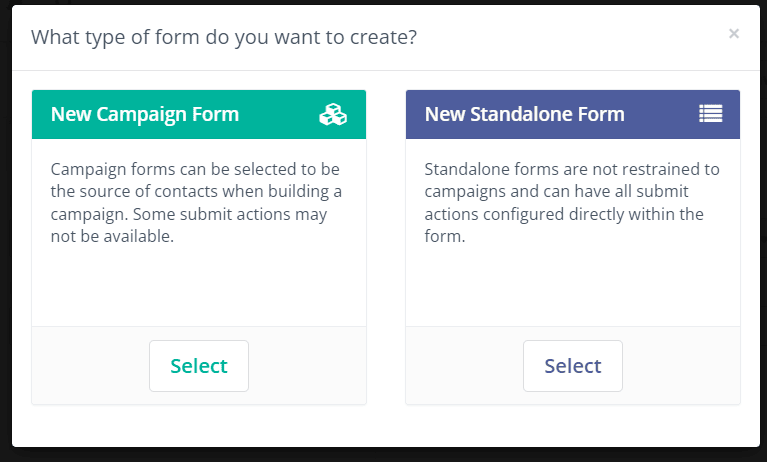
There are two types of forms in Mautic: “Campaign and Standalone form.” You can choose a campaign form, which acts as the primary contact source in your campaigns, or a standalone form, which can have all submit actions configured directly within the form.
Step 3
Customise Your Form Settings
Regardless of which form you select in step 2, you will be brought to a form builder that offers identical options. On the builder page, you will need to give your form a name and a description to help you identify it later. You can also add the form to a category and set the publishing and unpublishing date; it depends on you or what you need the form for.
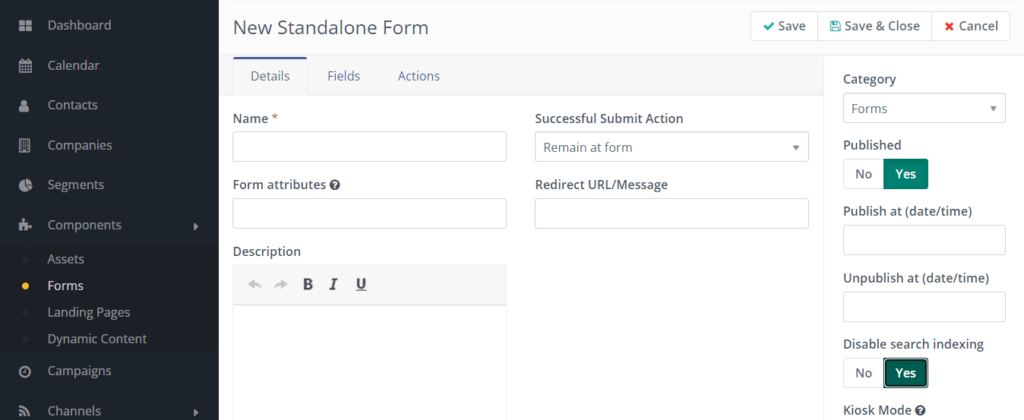
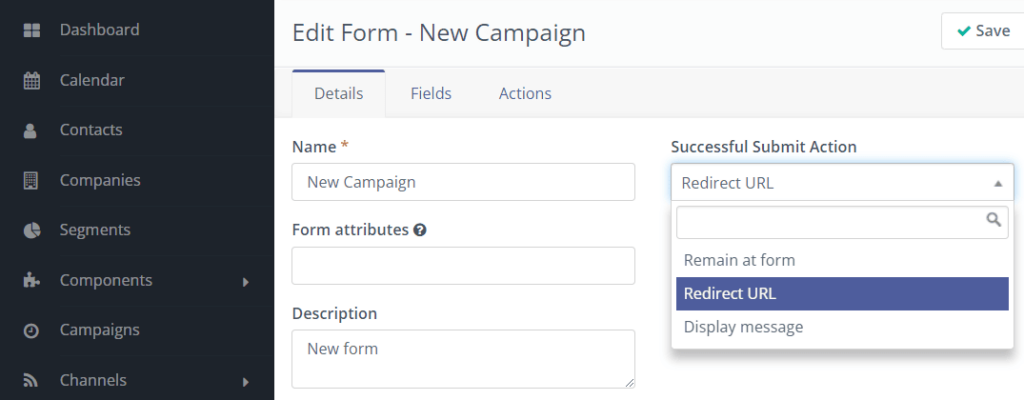
You can also determine what will happen when your prospects submit forms. (i.e. whether they will remain on your form, be redirected to the landing or thank you page, or receive a pop-up message) under the “Successful Submit Action” section, as seen in the image below.
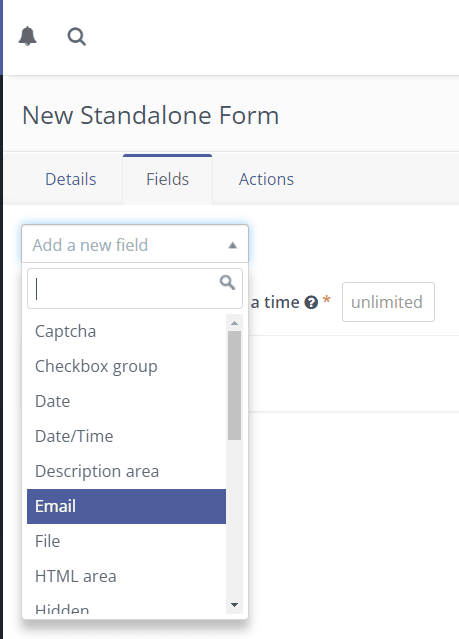
Once you are done customising your form details, click on the fields section to begin designing your form with different fields. In the “Fields” section, you can choose from several fields, such as text, date, social login, checkbox, description area, HTML area, page break, country list, and more.
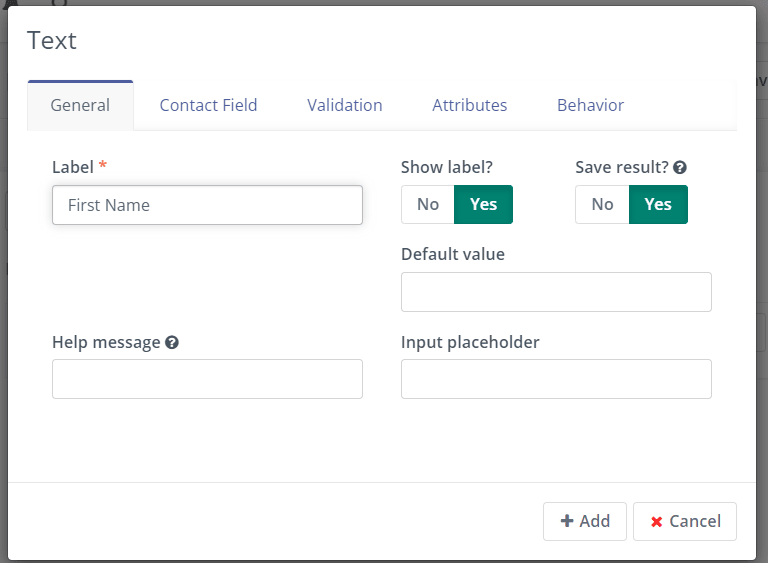
Once you select any field you want to use, you can customise the field accordingly by naming the field under general; you can decide whether to show the label or not, input the placeholder and help message if you need one.
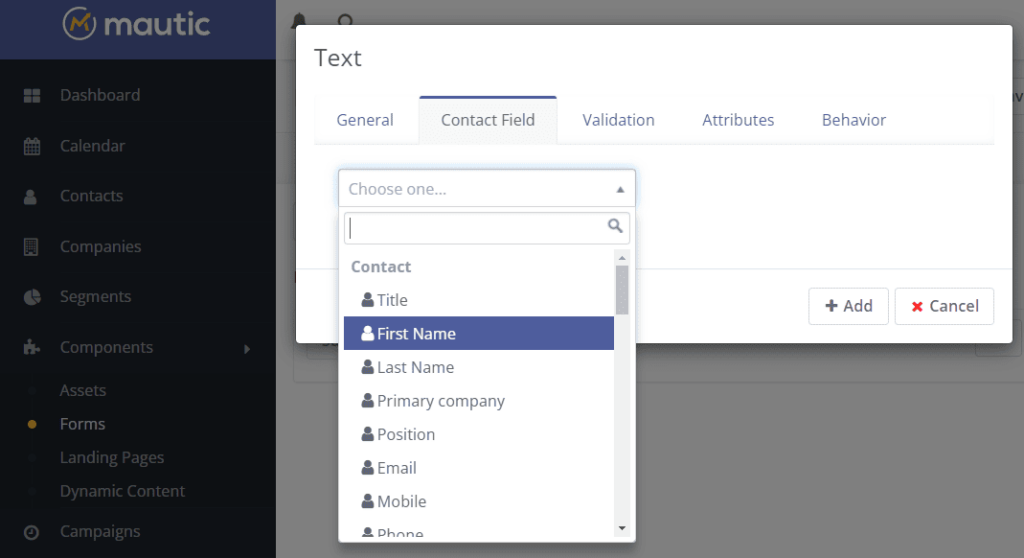
Under the “Contact Field” section, you can match your form field to a pre-existing property in your Mautic database. For example, you can match a text field to the first or last name, you can match phone to the contact phone, and email to the primary emails.
You can also set the field to required under the validation section and enter the validation message to display when the user forgets to fill in the required field.
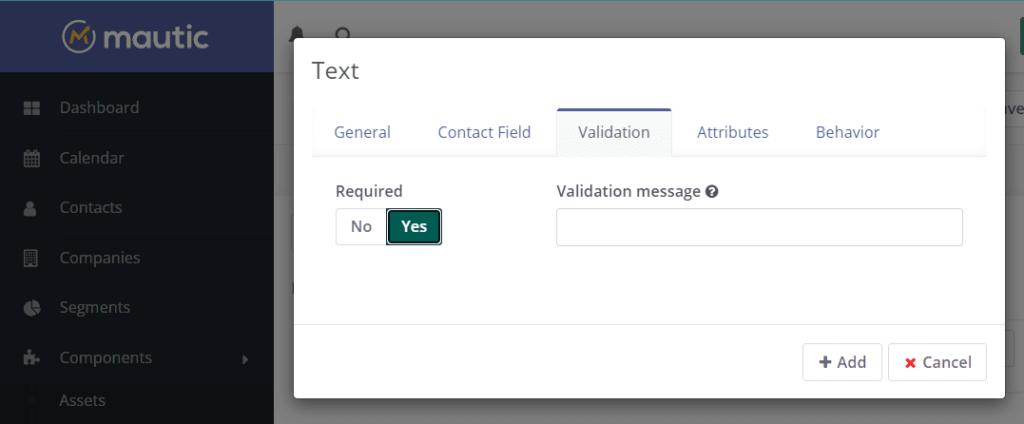
Once you’ve customised the form field to your liking, click “Add.” Repeat the process with as many fields as you need in your form.
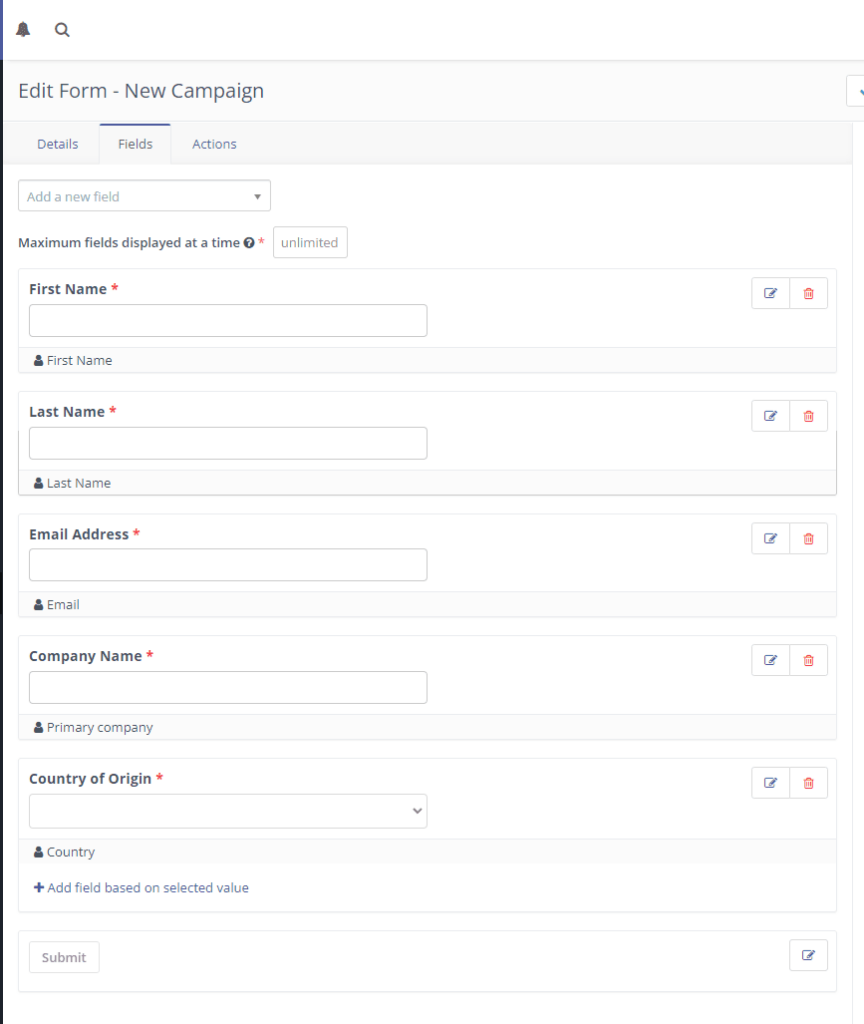
Step 4
Add Actions for Form Submissions
After designing your form, you can specify actions to be taken when the form is submitted. Click on the “Actions” tab. You can choose to add contacts to a segment, add or remove points, send notifications, send email to the contact, push the contact to integration, or allow the user to download your assets. For example, you can also send a thank you email to your contact.
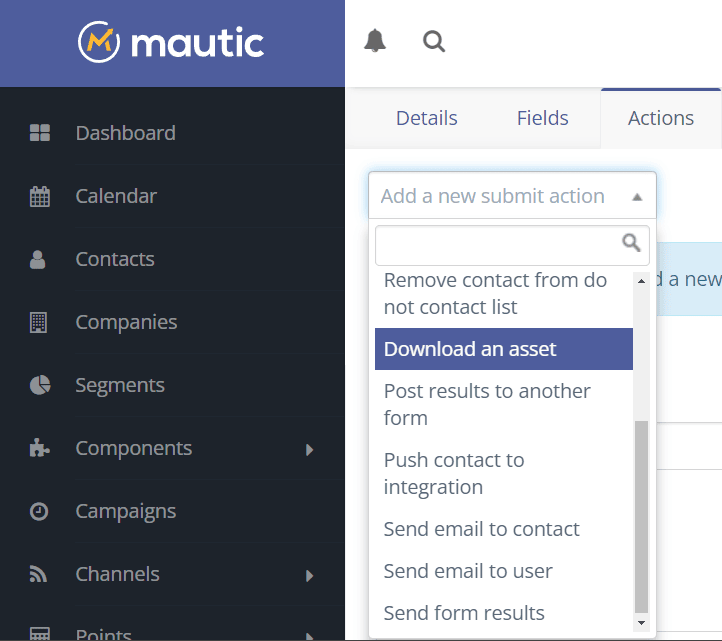
Step 5
Save and Publish
Once you’ve configured and customised the form as desired, you can click the “Save and close” button in the top right corner. This will provide you with an embed code to add to your website.

Step 6
Embed the Form on Your Website
Once you are satisfied with the form you created, copy the provided embed code and paste it into your website or landing page where you want the form to appear. Mautic provides you with two methods to copy the code. Automatic JavaScript code allows the form to be automatically updated on your website each time you edit and save the form. You don’t have to re-paste the code on your website again. But if you use the Manual copy, you will need to re-paste the form code each time you update your Mautic form.
Editing Your Forms
If you need to add more fields to your form or wish to change any part of the form, you can edit your Mautic form anytime. Just click on the form under the component, and it will display all your forms; then click the drop-down arrow behind the form name you want to edit, and click edit from the displayed text.
How to Style Mautic Form with CSS
As we know, first impressions matter. Since forms are the first contact potential customers will have with your business, you need to style your forms to match your website design and make it get your user’s attention to persuade them to fill them. Mautic form look dull by default, but with a little CSS code, you can give the form a new look and make it more attractive to your customers.
Styling Mautic forms with CSS allows you to customise the appearance of the forms to better match your website’s design. You can use custom CSS to change colours, fonts, spacing, and more of your Mautic forms.
Here are some Mautic forms examples I style using CSS. You can check and modify the CSS code to match your website needs.
Example 1
In this example, the form only contains the email address and button. I love this type of Mautic form because it’s simple and clean. Only asked for the email address. This is what I use on my blog as my op-tin form.

.mauticform-page-wrapper.mauticform-page-1{
  display: flex !important;
  width: 100%!important;
  margin-left: 110px;
}

.mauticform-input{
  font-size: 18px !important;
  line-height: 23px;
  color: #000 !important;
}

.mauticform-row {
    display: block;
    margin-bottom: 0px;
  width: 100%!important;
}
//* Button, you can change the button color here*//
.mauticform-button-wrapper .mauticform-button.btn-default {
    color: #fff;
    background-color: #000;
    border-color: #000;

    margin-left: -5px;
  width: 52%;
  letter-spacing: 2px;
   border-radius: 0px 5px 5px 0px;
   padding: 20px 15px 21px !important;
  font-family: Georgia !important;
  Line-height: 24px !important;
  font-size: 20px;
}

.mauticform-button-wrapper .mauticform-button {
    /* display: inline-block; */
    margin-bottom: 0;
    font-weight: 700;
    text-align: center;
    vertical-align: middle;
    cursor: pointer;
    background-color: #000;
    border: 1px solid transparent;
    white-space: nowrap;
    padding: 15px 25px;
    font-size: 20px;
    line-height: 1.3856;
  border-radius: 3px;}


input[type=email]  {
    border-top-left-radius: 6px;
    overflow: hidden;
    border-bottom-left-radius: 6px;
    padding-top: 21px !important;
    padding-bottom: 21px !important;
    padding-left: 20px !important;
    background-color: rgb(255,255,255) !important;
  font-weight: 400 !important;
  /*border-color: #fff;*/
}

.mauticform_wrapper {
    max-width: 100%;
  margin: 10px auto;}

//* On smaller screen*//
@media only screen and (max-width: 767px) {
.mauticform-page-wrapper.mauticform-page-1{
  width: 100%!important;
  margin-left: 10px;
}

.mauticform-input{
  font-size: 14px !important;
  line-height: 20px;
  color: #000 !important;
}

.mauticform-row {
    display: block;
    margin-bottom: 0px;

}
@media only screen and (max-width: 767px) {
.mauticform-button-wrapper .mauticform-button.btn-default {
    color: #fff;
    background-color: #000;
    border-color: #000;
   margin-left: 20px !important;
    width: 100%;
  letter-spacing: 2px;
   border-radius: 0px 5px 5px 0px;
   padding: 15px 15px 17px !important;
  font-family: Georgia !important;
  Line-height: 24px !important;
  font-size: 18px;
  }}

.mauticform-button-wrapper .mauticform-button {
    display: inline-block;
    margin-bottom: 0;
    font-weight: 700;
    text-align: center;
    vertical-align: middle;
    cursor: pointer;
    background-image: none;
    border: 1px solid transparent;
    white-space: nowrap;
    padding: 10px 20px;
    font-size: 18px;
    line-height: 1.3856;
 }

 input[type=email]  {
    border-top-left-radius: 6px;
    overflow: hidden;
    border-bottom-left-radius: 6px;
    padding-top: 18px !important;
    padding-bottom: 18px !important;
    padding-left: 10px !important;
    background-color: rgb(255,255,255) !important;
  font-weight: 400 !important;
  width: 195% !important;
}

}
.mauticform-errormsg {
    display: none;
}

@media all and (min-width: 768px) and (max-width: 980px) {
 .about-optin .mauticform-page-wrapper.mauticform-page-1{

  width: 100%!important;
  margin-left: 25px !important;

}

.mauticform-input{
  font-size: 19px !important;
  line-height: 20px;
  color: #000 !important;
}
.mauticform-row {
    display: block;
    margin-bottom: 0px;
}
@media all and (min-width: 768px) and (max-width: 980px) {
.about-optin .mauticform-button-wrapper .mauticform-button.btn-default {
    color: #fff;
    background-color: #000;
    border-color: #000;
   margin-left: 95px !important;
    width: 67%;
  letter-spacing: 2px;
   border-radius: 0px 5px 5px 0px;
   padding: 15px 15px 20px !important;
  font-family: Georgia !important;
  Line-height: 24px !important;
  font-size: 20px;
  }}

.mauticform-button-wrapper .mauticform-button {
    display: inline-block;
    margin-bottom: 0;
    font-weight: 700;
    text-align: center;
    vertical-align: middle;
    cursor: pointer;
    background-image: none;
    border: 1px solid transparent;
    white-space: nowrap;
    padding: 10px 20px;
    font-size: 20px;
    line-height: 1.3856;
 }

.about-optin input[type=email]  {
    border-top-left-radius: 6px;
    overflow: hidden;
    border-bottom-left-radius: 6px;
    padding-top: 19px !important;
    padding-bottom: 19px !important;
    padding-left:20px !important;
    background-color: rgb(255,255,255) !important;
  font-weight: 400 !important;
  width: 163% !important;
  }}
Example 2
You can style the Mautic form to serve as your form for subscribers. This type of form contains a name and email field with the button. You can copy the CSS code below to display your Mautic form in 3 columns.

.mauticform-page-wrapper.mauticform-page-1{
  display: flex !important;
  width: 100%!important;
  margin-left: 0px;
}
.mauticform-input{
  font-size: 15px !important;
  line-height: 21px;
  color: #000 !important;
  border: 1px solid rgb(224,224,224);
}
.mauticform-row {
    display: block;
    margin-bottom: 0px;
  width: 100%!important;
}
.mauticform-button-wrapper .mauticform-button.btn-default {
    color: #fff;
    background-color: #3ea055;
    border-color: #3ea055;
    border: 2px solid #3ea055;
  width: 100%;
  letter-spacing: 2px;
   border-radius: 3px 3px 3px 3px;
   padding: 10px 10px 13px !important;
  font-family: Georgia !important;
  Line-height: 20px !important;
  font-size: 18px;
}
.mauticform-button-wrapper .mauticform-button {
    /* display: inline-block; */
    margin-bottom: 0;
    font-weight: 700 !important;
    text-align: center;
    vertical-align: middle;
    cursor: pointer;
    background-image: none;
    border: 1px solid transparent;
    white-space: nowrap;
    padding: 15px 25px;
    font-size: 18px;
    line-height: 1.3856;
  border-radius: 3px;}

input.text, input.title, input[type=email], input[type=password], input[type=tel], input[type=text], select, textarea {
    border-top-left-radius: 3px;
    overflow: hidden;
    border-bottom-left-radius: 3px;
    padding-top: 11px !important;
    padding-bottom: 12px !important;
    padding-left: 20px !important;
    background-color: rgb(255,255,255) !important;
  font-weight: 400 !important;
  border-color: #000;
}

.mauticform-page-1 .mauticform-row:not(:last-child) {
        margin-right: 13%; /* Adjust this value for the desired space between columns */
    }
Example 3
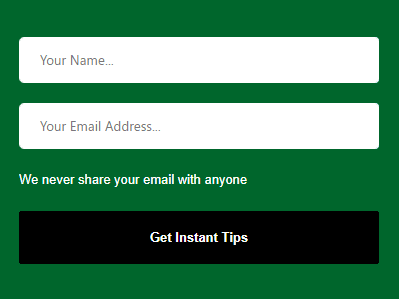
In this example, you can use this form on your sidebar as a lead magnet form for your subscribers. It contains the name, email field, and button with a description field for the simple notice.
.maut input.text, input.title, input[type=email], select, input[type=text] {
    border-top-left-radius: 6px;
    overflow: hidden;
    border-bottom-left-radius: 6px;
    padding-top: 13px!important;
    padding-bottom: 14px!important;
    padding-left: 20px!important;
    background-color: rgb(255,255,255)!important;
    font-weight: 400!important;
  width: 60%!important;}

.mauticform-button-wrapper .mauticform-button.btn-default {
    color: #fff;
    background-color: #000;
    border-color: #000;
  width: 60%;
}
.mauticform-button-wrapper .mauticform-button {
    display: inline-block;
    margin-bottom: 0;
    font-weight: 700;
    text-align: center;
    vertical-align: middle;
    cursor: pointer;
    background-image: none;
    border: 1px solid transparent;
    white-space: nowrap;
    padding: 18px 12px;
    font-size: 13px;
    line-height: 15px;
    border-radius: 3px;
    -webkit-user-select: none;
    -moz-user-select: none;
    -ms-user-select: none;
    user-select: none;
}

p:not(.has-background):last-of-type {
    padding-bottom: 0;
    color: #fff;
    font-size: 13px;
  line-height: 22px;
}
Final Thoughts
Using forms to generate leads is a powerful strategy for businesses and organizations. Mautic Forms provide a structured and efficient way to collect valuable information from your potential customers or clients. By designing user-friendly and engaging forms, you will gather contact details and gain insights into customer preferences, needs, and behaviours.
You can then use the data to tailor your marketing efforts, nurture leads, and drive conversions. With the right approach, forms are a valuable tool in building a strong and engaged customer base, contributing to the growth and success of any business.





0 Comments