
If you plan to advertise using Facebook or you are currently running ads on Facebook for effective engagement or perhaps you plan to use it in the future. There’s one great and powerful marketing tool you should be using, it’s called Metal Pixel (formerly known as Facebook Pixel.) Facebook Pixel is a piece of code from Facebook that you can use to track how people engage with your website. Then, you can use this data collected to better target your ads by creating custom audiences. The Facebook Pixel is a must tool in getting the most out of your ads.
Here’s everything you need to know about Facebook Pixel and how it works.
Table of Contents
What is a Facebook Pixel?
Facebook pixel is a small piece of JavaScript code that you can place on your website. It’s an analytics code from Facebook that tracks the users’ activities on your website. It measures the effectiveness of your advertising by understanding the actions people take on your website. The code allows you to monitor site visitors’ conversions from Facebook ads, optimise ads, build targeted audiences for future ads and ensure your Facebook ads are shown to the right audience.
The pixel gives insights into how your audience interacts with your Facebook ads. It also provides data on how Facebook users interact with your website after they click on an ad.
Once you place Facebook pixel on your website, the Facebook pixel lets you:
- Understand how Facebook ads influence conversions.
- Optimise ad delivery so you can target the most receptive audiences.
- Remarket to people who have visited your site.
- Build Facebook lookalike audiences (e.g., use performance data to create audiences of the people most likely to respond to your ads).
- Refine and optimise your Facebook marketing strategy.
Why use a Facebook Pixel?
The Facebook pixel provides crucial information you can use to create better Facebook ads and target your ads to the right people. Facebook tracking pixel data helps ensure your ads are seen by the people who are most likely to take your desired action. The pixel lets you fine-tune your ads using criteria such as user location, demographics, interests and behaviours. This code helps you improve your Facebook ad conversion rate and get better ROI.
There are many reasons why you need a Facebook pixel on your website. Here are some of the main benefits:
- Optimise the delivery of your ads
With Facebook pixel on your website, you are sure that your ads will be shown to the people who are most likely to take the action you want them to take. For example, if you want to increase sales, you can use the Facebook pixel to show your ads to people who are more likely to buy your product or service. This way, you can reduce your cost per acquisition and increase your return on ad spend.
- Measure cross-device conversions
Facebook pixel allow you to understand how your cross-device ads help influence conversions. For example, you can see how many people viewed your ad on a mobile device but completed a purchase on a desktop device. This way, you can optimise your ad strategy and budget across different devices and platforms.
- Create custom audiences from website visitors
You can use the Facebook pixel to create custom audiences from your website visitors. For example, you can create a custom audience of people who visited a specific page, added an item to their cart, or completed a purchase. You can then use these custom audiences to show them more relevant and personalised ads based on their behaviour and interests. This way, you can increase your customer loyalty and retention.
- Get insights from your Meta Pixel dashboard
Facebook Pixel helps to get rich insights about how people use your website from your Meta Pixel dashboard. For example, you can see the number of conversions, the conversion value, the cost per conversion, and the conversion rate for each of your website events. You can also see demographic, geographic, and device data of your website visitors. This way, you can improve your website design, content, and user experience.
Who Should use Facebook Pixel?
Every website owner should add a Facebook pixel to their website. As a matter of fact, every brand needs Facebook Pixel on their site. There is absolutely no disadvantage to using the Facebook pixel on your website, it’s absolutely free and won’t increase your site loading time, it will rather optimise your ad and get you better Facebook ROI. Even if you’re not yet ready to create Facebook ads, you should install the Facebook pixel now to take advantage of pixel measurement capabilities so that you won’t start from scratch when you are ready to create Facebook ads.
What to do with the Data Collected
Since Facebook Pixel tracks significant customer behaviour on your site, you can use Facebook Pixel’s tracking data to target your Facebook ads to people who are already interested in your products, this will optimise your Facebook ad and increase your conversion rate. It’s a known fact that you can use Facebook Pixel to target people that most likely to spend the most amount of money on your site.
Here are the ways to use data collected by Facebook Pixel
- Conversion Tracking
Facebook pixel allows you to see how people interact with your website after viewing your Facebook ad. You can use Facebook Pixel to understand how people relate to your website after they click on one of your ads. See the pages they go to and if they visit your site on another device. For instance, if someone originally finds your website on a smartphone, and then completes the purchase on their laptop or maybe it’s the other way around. You can use this data to refine your ad strategy and optimise your mobile experience.
You can also use Facebook retargeting pixel data and dynamic ads to show targeted ads to people who have already visited your site. For example, you can show people an ad for the exact product that they abandoned in a shopping cart or added to a Wishlist on your website. This increases your chance of closing the sale and keeps your brand fresh in the minds of potential customers.
- Create Lookalike Audiences
You can also use Facebook Pixel data to build a lookalike audience of people who have similar likes, interests, and demographics to people who are already interacting with your website. This can help expand your potential customer base.
- Optimise Facebook ads for Conversion
You can also use Facebook tracking pixel data to optimise your Facebook ads for specific conversion events on your website. Without a pixel, the only conversion you can optimise for is link clicks. But with the Facebook pixel installed on your site, you can optimise for conversions that are in line with your business goals, like purchases and sign-ups.
- Optimise Facebook ads for Value
As Facebook collects data on who buys from your site and how much they spend, it can help you optimise your ad audience based on value. That means it will automatically show your ads to the people who are most likely to make high-value purchases.
- Have Insights about Facebook ad Tools and Metrics
With Facebook Pixel you can track metrics like cost per lead or cost per conversion. This can only be achieved with Facebook Pixel installed on your site.
How to use Facebook Pixel
You can use Facebook Pixel to collect data on two different kinds of events.
- There are 17 predefined standard events.
- You can set up custom events yourself.
Facebook “events” are particular actions taken by your website visitors, such as making a purchase.
Facebook Pixel Standard Events
- Add payment info: When someone enters payment information when buying items on your website
- Add to Cart: Someone adds a product to their shopping cart on your site
- Add to wishlist: Someone adds items to a wishlist on your website
- Complete registration: Someone completes a registration, subscribed or sign up for a service on your site
- Contact: Someone contact your business using the telephone, SMS, or email on your website
- Customize product: The customization of products through a configuration tool or other application your business owns
- Donate: Someone makes a donation to your cause
- Find a location: Someone searches for your business’s physical location with the intention to visit.
- Initiate checkout: When someone initiates the checkout process to buy something from your site.
- Lead: when someone expresses interest in your offering, sign up for a trial service or form submission.
- Purchase: Someone completes a purchase on your website.
- Schedule: When someone books an appointment to visit your business.
- Search: When someone searches for you online
- Start trial: When someone signs up for a free trial of your product.
- Submit application: When someone submits a registration form for a product, service or program you offer
- Subscribe: Someone subscribes to a paid product or service.
- View content: Someone lands on a specific page on your website.
If you wish to collect more information about events on your site than what Facebook Pixel standard events can provide, you can use custom events. You can use custom events in place of standard events. Custom events use URL rules based on specific URLs or URL keywords.
These allow you to customize the standard events based on factors like:
- How much a conversion event is worth
- Currency
- Content type
- Predicted long-term value
Learn more about the custom event in this Facebook help article.
How to Create a Facebook Pixel
Now that you’ve known what Facebook Pixel is used for and what you can track with it, it’s time to create your pixel and put it to work on your website.
To add Facebook Pixel to your site, just follow these steps.
Steps To Create Facebook Pixel
Step 1. Log on to Facebook Business Manager and click Data sources menu at the left-hand side.
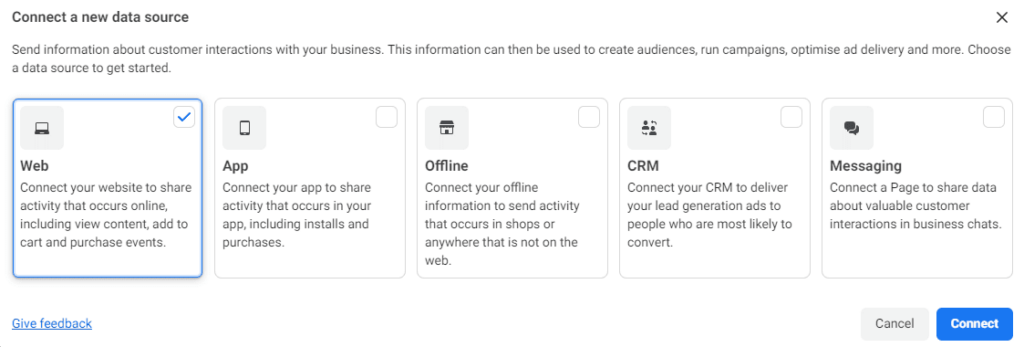
Step 2. Click Data Sources in the left margin, select Web from the five (5) options that pop up and click Connect. You can also create a pixel for your app, an offline source (e.g., a store) or your CRM.
Step 3. Name your pixel (e.g., New Facebook Pixel) and select Create Pixel.
Step 4. Once you name your pixel, Facebook will ask you to enter your URL to check for integrations with your web hosting platform or analytics software (e.g., Google Tag Manager). Enter your URL and click Check.

Step 5. Select the best method to integrate the pixel code with your website. You can do it manually or use any integrating plugin and extension.
Step 6. Choose how you would like to connect your website and send web activities to Facebook. You can choose Metal Pixel and conversion API or choose Meta Pixel alone.
Step 7. The next step is to choose the most suitable method to connect your website to the Metal pixel. There are a few ways to connect the Facebook Pixel depending on your website platform.
Click install code manually button to get your Facebook Pixel code and click the green Copy Code button to copy the code.
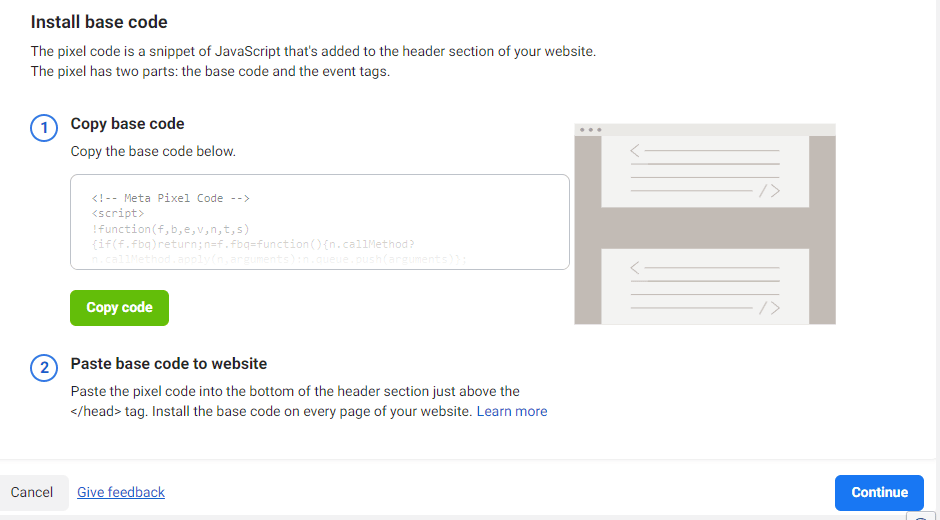
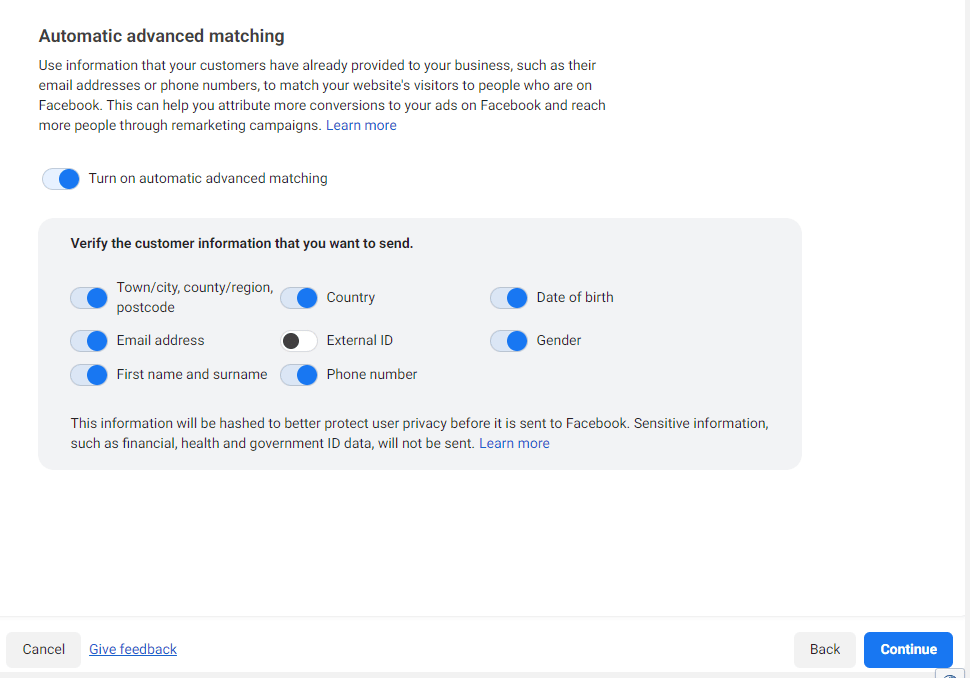
Paste the pixel code into the header code of your website, just above the </head> tag. It’s better to place it into your header template to avoid placing it on every page of your website. Click Continue. Then choose whether to use automatic advanced matching. This option matches hashed customer data from your website to Facebook profiles. This method allows you to track conversions more accurately and create larger custom audiences. Then click Continue.
If all goes well, you’ll get a confirmation that Facebook Pixel is now active on your website. If it fails, make sure you added the code to the right part of your website.
Track the Right Events for Your Business
Now that you have Facebook Pixel on your website, you need to choose what actions you’d like to track. You can choose from the 17 predefined standard events using the toggle button. Select which template best fits your website. Then, at the centre of the screen, you can see all of the data that template tracks. Go through the list and look for additional setup instructions for each feature. This requires copying and pasting additional code into your site’s <header> tag.
Confirm the Facebook Pixel on your Website
Now you’ve selected the data you’d like to track, you will need to add the Facebook Pixel Helper extension to Google Chrome and load your webpage. The extension’s </> icon will turn blue when it finds working Facebook Pixel code on your website.
Add Facebook Pixel Cookies notice to your website
Now that Facebook Pixel code is running on your website you will need to provide clear cookies notice to your website privacy policy page to inform your visitors how you collect their data through Facebook Pixel in compliance with Facebook’s terms and laws of some countries. You also need to let users know how they can opt-out of having their data collected.
FINAL THOUGHTS
Facebook Pixel is one of the most powerful marketing tools known in the social media marketing world. It’s therefore a must-use tool for every website owner, digital marketers and whoever planning to advertise using Facebook. Like I said earlier you lose nothing by using Facebook Pixel on your site rather you gain a lot by expanding your target audiences and getting better ROI.
What’s your thought about using Facebook Pixel? Let’s hear in the comments section.


Hey There thanks so much for talking about this side of working in digital.
Glad you find it useful.