

So, you’re looking for a clean, simple way to manage your web server without pulling your hair out over Linux commands? That’s where aaPanel steps in, a free, beginner-friendly control panel that makes server management on Ubuntu feel like managing a WordPress blog.
In this guide, I’ll show you how to install aaPanel on Ubuntu step-by-step. Whether you’re using Ubuntu 20.04, 22.04 or 24.04, this tutorial covers the full process, from server requirements to post-installation setup.
By the end, you’ll have:
- A fully working aaPanel dashboard running on your VPS or dedicated server
- Access to tools like Nginx, Apache, MySQL, PHP, and FTP, all from a sleek web interface
- A foundation ready to host websites, manage databases, and deploy apps
Table of Contents
What is aaPanel and why should you use it
If you’ve ever tried managing a Linux server using only the terminal, you know it can feel like trying to fly a plane with no cockpit. That’s where aaPanel comes in.
aaPanel is a free web hosting control panel for Linux, built to help you manage your Ubuntu server using a point-and-click interface, and you don’t need deep Linux knowledge. It’s like cPanel, but lighter, faster, and way easier to use.
And the best part? You can do all this through your browser. No more jumping between SSH windows and Google search tabs, trying to remember commands.
It works seamlessly on Ubuntu from 18.04 to Ubuntu 24.04, and most other popular Linux distributions. So whether you’re hosting websites, running client projects, or just learning the ropes, aaPanel saves time, reduces mistakes, and gives you full control.
But aaPanel isn’t just about installing Apache or checking your disk space. It’s packed with serious features that make it the best control panel.
You can run Node.js, Python, and custom scripts. It also comes with Full Docker support to manage containers and services. You can host and manage any app, site, or stack: PHP, HTML, Laravel, Django, React, WordPress, you name it.
For Marketers & Business Owners, it comes with a built-in email marketing tool with ready-to-use email templates that allow you to send out newsletters or campaigns straight from your panel.
It supports a One-click WordPress Toolkit for fast installs and management. You also enjoy easy app management to install tools like phpMyAdmin, Redis, Memcached, and more from the App Store.
You can also manage cron jobs, SSL, firewall, DNS, file permissions, MySQL, and FTP, all in one place. You can set up multiple sites on one server with custom ports and domains with no limitations.
System Requirements for Installing aaPanel
Before we jump into installing aaPanel on your Ubuntu server, let’s make sure your system meets the aaPanel minimum requirements.
Here are the minimum system requirements for aaPanel:
Supported Operating Systems:
- Ubuntu 18.04, 20.04, 22.04, 24.04
- Debian 10/11
- CentOS 7/8
- CloudLinux 7.x, 8.x
- AlmaLinux 8.x, 9.x
- Rocky Linux 8.x
For the sake of this guide, we’re sticking with Ubuntu, since it’s the most popular choice for most VPS users.
Hardware Requirements:
| Component | Minimum Recommended |
|---|---|
| CPU | 1 core |
| RAM | 512MB (1GB+ strongly recommended) |
| Storage (Disk) | 1GB minimum (5GB+ ideal) |
Pro Tip: aaPanel will install and run on a system with 512MB RAM, but you’ll quickly hit limits if you’re planning to install Apache/Nginx, MySQL, and PHP. So go for at least 1GB RAM (2GB+ if you’re hosting websites).
Other Requirements:
- Root access (or sudo privileges)
- A clean Ubuntu installation (fresh server works best)
How to Install aaPanel on Ubuntu (22.04/24.04)
Here’s an easy step-by-step guide to download and install aaPanel on Ubuntu 22.04 or 24.04. Make sure you’re logged in as root or a user with sudo privileges.
Step 1: Update Your System
Open your terminal or SSH into your server. Run this command to update package lists and upgrade any outdated software:
sudo apt update && sudo apt upgrade -yThis will update and upgrade your Ubuntu server packages before installing aaPanel.
Step 2: Install Required Dependencies
You’ll need wget and curl for downloading the aaPanel script. Just in case they’re missing, install them:
sudo apt install wget curl -yStep 3: Download the aaPanel Installation and the Script
Now, let’s grab the official aaPanel installation script:
wget --no-check-certificate -O install_7.0_en.sh https://www.aapanel.com/script/install_7.0_en.sh sudo bash install_7.0_en.shThis command will prompt you to confirm the location of your installation. Enter y to continue.
Now, sit back and relax for at least two minutes. aaPanel will install the Web server base, Admin panel files and all necessary environment setups.
After the installation is done, the screen will display the URL to the aaPanel web interface, your username, and the password. Just like in the image below

You may need to copy and save the aaPanel Internet Address, Username and password in a safe place, you will need them to log in to your dashboard.
Access the aaPanel Dashboard via Browser
Copy and paste the aaPanel Internet Address URL (e.g. https://88.888.888.888:11111/king88d92) into your browser, and you will have access to your aaPanel login page. Make sure you copy the correct URL.
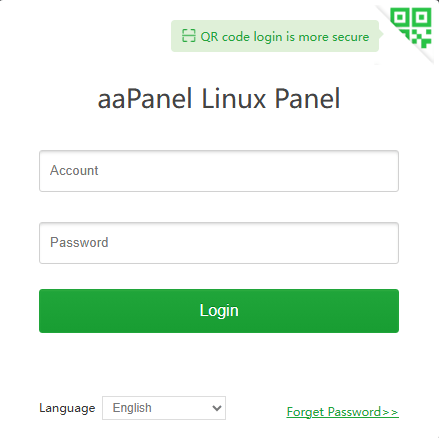
To access the dashboard homepage, enter your login credentials (username and password). Upon logging in, a modal window will appear confirming the successful installation of aaPanel.
After closing this modal, aaPanel will prompt you to install essential software packages from either the LNMP (Nginx stack) or LAMP (Apache stack). These packages may include Nginx, MySQL, PHPMyAdmin, and other tools. Select the ones you need, along with any additional packages from the provided list, to complete your setup.
Choose one based on your preference. LNMP (Nginx stack) is the recommended package by aaPanel because it’s faster and lighter.
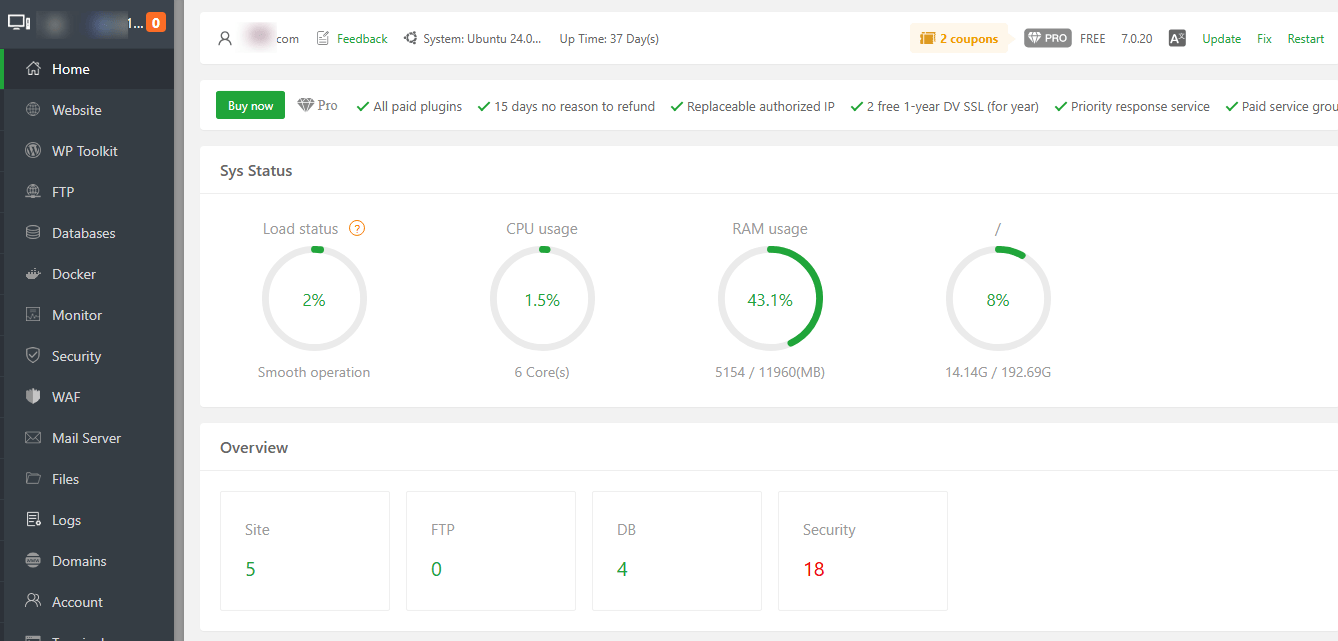
Once installations of the LNMP or LAMP stack are successful. You will be able to access your aaPanel beautiful dashboard, where you can host or manage your websites.
Secure Your aaPanel Dashboard
Once you’ve installed aaPanel on your Ubuntu server, it’s time to tighten things up and give your control panel a proper domain name; no one likes typing an IP address every time.
From the left-hand side of the dashboard, scroll down and click on settings, change the Alias from “aaPanel Linux Panel” to your Brand name to reflect your brand’s identity. Also, change the Panel user from the default given to you during installation to something else and don’t forget to change the Panel default password to a strong password of your choice.
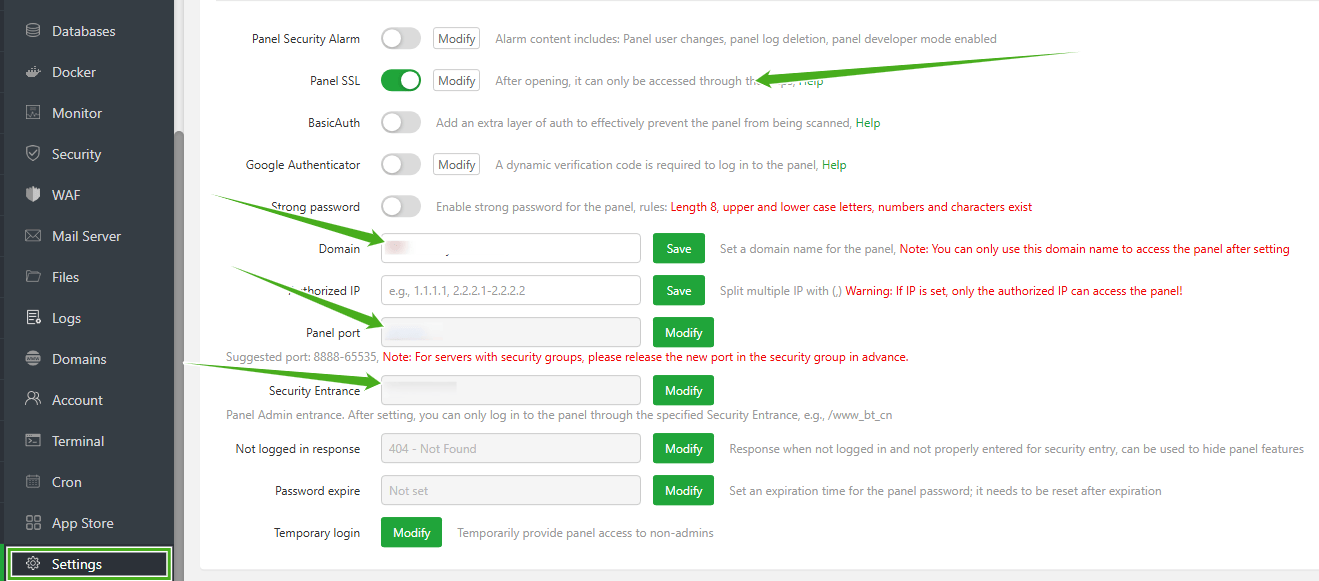
Don’t forget to add your subdomain, so that you can access the panel using the domain instead of the IP address. You can also change the default panel port and security entrance to something else.
Final Thoughts
Installing aaPanel on Ubuntu isn’t just quick, it’s one of the smartest ways to manage and control your VPS or Dedicated server without wrestling with endless Linux terminal commands.
Whether you’re hosting client sites, personal projects, or building the next big thing, aaPanel makes managing Linux servers a breeze. It’s lightweight, free, and loaded with features that normally hide behind a paywall in tools like cPanel.
Now that your aaPanel is up and running, you can start adding websites, databases, and apps with just a few clicks. If you need help getting anything done on your aaPanel, you can hit me up in the comment sections, and I will be happy to help.
Frequently Asked Questions (FAQs)
Is aaPanel free to use?
Yes, aaPanel is completely free. It offers all the essential features like Nginx/Apache support, database management, FTP, SSL, and cron jobs without charging a dime. There are optional premium plugins, but the core features will handle most users’ needs.
Can I install WordPress using aaPanel?
Yes! You can install WordPress and other CMS platforms easily. Set up a site in aaPanel, create a database, and upload WordPress through the File Manager or FTP. aaPanel also offers a one-click app installer.
Is aaPanel secure?
Yes, but like any control panel, it depends on your aaPanel setup. To secure aaPanel:
Change the default port and Security Entrance. Use SSL and regularly update software, and disable unused ports

0 Comments